EDIT: In April 2022, the Raspberry Pi foundation no longer allows default passwords on Raspberry Pis. Therefore,
instructions as written originally here no longer work. I have modified them slightly to show how to complete the
headless setup using the new Raspberry Pi imager. The original text still appears, but is struck out.
Today’s post is about setting a Raspberry Pi running the 64-bit Raspberry Pi OS for classroom use. This setup is very portable, uses very few cables, and costs about $60.00. For people using the textbook Dive into Systems, this setup gives students a Linux system that is compatible with the contents of the book (C programming, ARM64 assembly, multicore programming).
I had originally written this post about the Raspberry Pi 4 specifically, but there seems to be a shortage of available Raspberry Pi 4s to purchase. I therefore adapted this tutorial to work with older models of Raspberry Pi (the 3B and 3B+), in case others (like myself) have older boards lying around. Please note that this tutorial will not work on the Raspberry Pi 2, which was the last Raspberry Pi with a 32-bit ISA. The Raspberry Pi 3, released in February 2016, was the first 64-bit Raspberry Pi, though the Raspbian OS was 32-bit for many years following. Raspberry Pi OS is the successor for Raspbian, and the Raspberry Pi OS 64-bit OS is currently a beta release.
This tutorial is much simpler than previous tutorials, because the Pi now comes preloaded with Avahi/mDNS zero configuration networking, which greatly simplifies the process by which devices are discovered on a network. That means that for a simple classroom setup (where every student gets a single Pi, which they connect directly to a PC), there is no fiddling around with DNS or setting static IPs. It is incredibly easy for anyone to set Pis up in this manner. I have confirmed that these instructions work for Windows 10. Apple implements the Bonjour mDNS responder framework, which means that these instructions should also work for Apple machines right out of the box too.
About our classroom
The classroom I use for my course is currently equipped with a number of Windows desktops running Windows 10. I share this classroom space with a number of other professors, all who are teaching different courses, one after the other. Therefore, a dedicated Pi lab really isn’t an option, and we don’t want students to be tempted to disconnect/reconnect workstations peripherals as it can create problems for classes that take place after mine. Furthermore, there isn’t an easy way for students to connect the bulky power supplies that usually are needed for powering the Pi, since our power outlets are not located in a convenient place.
What our Raspberry Pi Setup looks like
Here is how students connect Raspberry Pi for use in my course:

In this setup, the Raspberry Pi uses the lab workstation for power, and connect to the Pi via VNC Viewer (instructions below). Setup is very quick, and virtually painless. The instructions in this tutorial will allow you to set up a Pi for use using software of your own, if you’d like. For initial setup, I recommend connecting the Pi to its own keyboard, mouse and monitor.
Parts List
To set this up you will need:
- A Raspberry Pi 4 + microSD card (8 GB+ recommended) - $40.00
- An Ethernet cable (1 ft recommended) ($1.00)
- An Ethernet to USB Adaptor ($10)
- A USB to USB-C power cable ($10) – For Raspberry Pi 4 OR
- A microUSB to USB-C power cable ($10) – For Raspberry Pi 3/3B+
Please note that the power cable here is a USB-C. There is an assumption that your computer has a USB-C port. See the “Troubleshooting” section if your machine does not have a USB-C port.
Step 1: Flash the microSD card
Download the latest Raspberry Pi OS (64-bit) Beta Release at this link:
https://downloads.raspberrypi.org/raspios_arm64/images/
NOTE: Be sure to download the LATEST image. Since the image is in Beta,
it is getting better all the time! As of writing, the latest one is dated
MAY 2021, and it’s SO much better than the 2020 Beta release image!
After unzipping the file, flash it to a microSD card using something like
BalenaEtcher
Download the newly released Raspberry Pi Imager from the Raspberry Pi Foundation. I strongly urge everyone to use this imager, since it is a.) officially supported by the Raspberry Pi foundation and b.) has embedded download links to the latest versions of the official PI images.
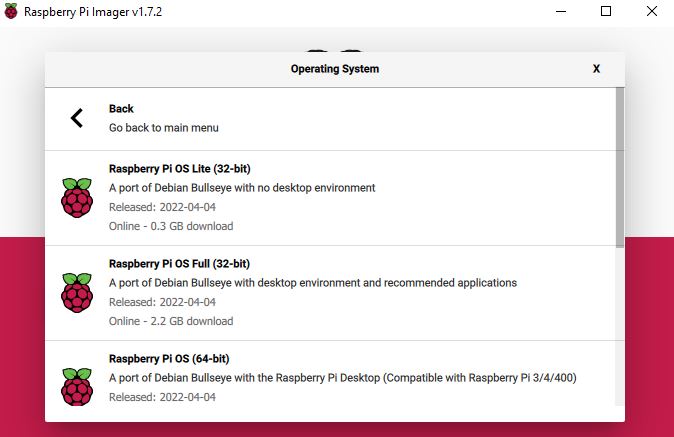
To access the 64-bit OS through Raspberry Pi imager, simply click on the “Choose OS” button, then “Raspberry Pi OS (other)” and then select “Raspberry PI OS (64-bit)”.
To ensure that you will be able to SSH directly into your Pi after booting, you will need to do a couple other configuration steps prior to hitting the WRITE button. Follow the next set of instructions carefully.
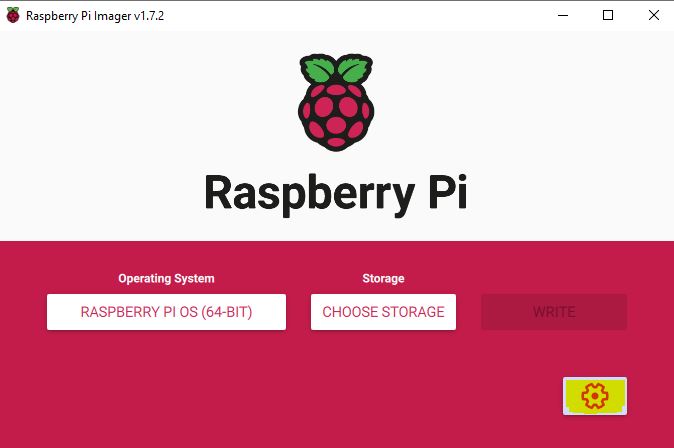
One you select the 64-bit OS, the next step is to click on the “gear” icon that appears in the lower, right-hand corner of the imager:
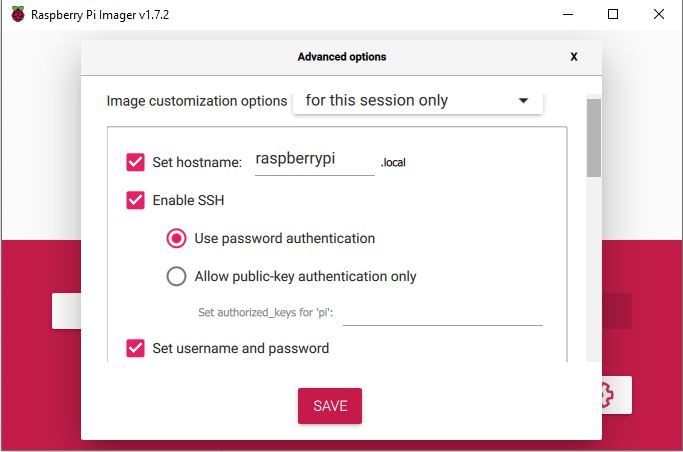
You will then need to click on “Set hostname”, “Enable SSH (use password authentication)”, and “Set username and password”:
Lastly, set a unique username and password. This is also a good time to configure your wireless LAN, if you are configuring the device for personal use (I would recommend skipping this step for classroom use, where each student may have their own login info for wireless).
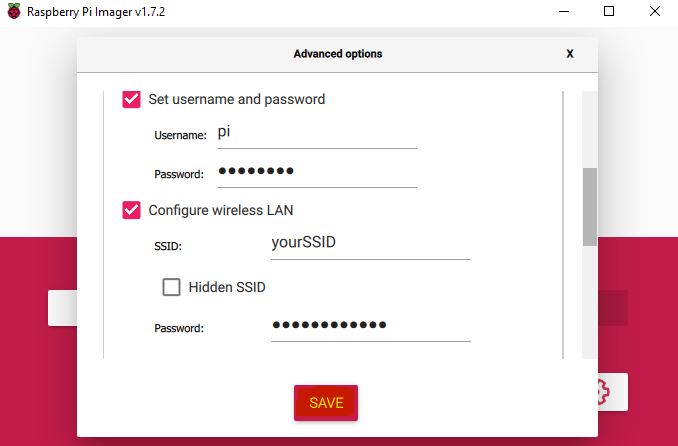
For the sake of this tutorial, we will assume that you kept your hostname as raspberrypi.local
and your username as pi. In practice, it is much more secure to change the default
username and password and the hostname to something unique to prevent the Pi from being
autodetected during portscans and potentially hijacked.
Once you complete all your configurations, click on “WRITE” to write the SD card.
Step 2: Configuring the Raspberry Pi
After booting it up, complete the following steps:
0. SSH into the raspberry pi by plugging in all the cables. You should be able to
ping the device by typing in ping raspberrypi.local. Once you get a series
of responses, you should be able to ssh into it using ssh pi@raspberrypi.local and e
entering in your new custom password.
-
If you have not done so already, Connect the Pi to WiFi (use your phone as a hotspot if your company IT policies don’t allow you to connect the Pi to the company network).
-
Update the system by typing
sudo apt-get update && sudo apt-get upgradeThis step is extremely important! This will ensure that the latest software updates for the 64-bit Pi distribution is downloaded to your Pi. If you do not complete this step, the rest of the tutorial may not work! Please note that there ARE definitely packages that need updating. If it appears that nothing needs to be updated, please check your Internet connection and try these commands again. It will take several minutes to complete this step! -
Reboot the Raspberry Pi by typing
sudo reboot. -
Install VNC Server and VNC client by typing
sudo apt-get install realvnc-vnc-server realvnc-vnc-viewerThis make take a few minutes to complete, so please be patient! -
Enable SSH and VNC on the Raspberry Pi through the
raspi-configmenu:- Type
sudo raspi-config
* Go to Interfacing Options –> SSH to enable the SSH sever- Go to Interfacing Options –> VNC to enable the VNC server
- (Recommended) Go to System Options –> Hostname to change hostname
- (Recommended) Go to System Options –> Password to change password
- Type
-
At this point, restart the pi by typing
sudo rebooton the command line. When the Raspberry Pi reboots, you should see a blue VNC icon in the upper-right corner. If you don’t see this icon, it’s likely that the VNC server was not enabled. Be sure to enable it!
Additional configuration instructions for Raspberry Pi 3/3B+
On older Raspberry Pis, I’ve noticed that I have headless connection issues.
The way I fixed this was by forcing a screen resolution. To do this, I
edited /boot/config.txt and uncommented out the following lines:
framebuffer_width=1920
framebuffer_height=1080
hdmi_force_hotplug=1
Lastly, go all the way to the bottom of /boot/config.txt and comment out the following line:
#dtoverlay=vc4-kms-v3d
Step 3: Connect to the Pi (from Windows 10)
For the next set of steps, you will need to know the hostname of the
Raspberry Pi. We assume that it is testpi in the examples that follow.
The set of instructions below is for computers running Windows 10. However,
since Bonjour/Avahi was developed by Apple, it should work out of the box for
Apple machines as well.
-
Ensure that the Pi is discoverable by attempting to ping it. Typing
ping raspberrypi.localshould result in a series of replies. -
Open up Windows PowerShell by clicking the Windows icon and typing in “PowerShell”
-
Confirm you can SSH into the Raspberry Pi by typing:
ssh pi@raspberrypi.localin Powershell. This should land you on the command line of the Pi. If you are satisfied with your students connecting to the Pi via command line you can stop here. -
Download and Install the VNC Viewer client for Windows: https://www.realvnc.com/en/connect/download/viewer/
-
Open up VNC Viewer by clicking the Windows icon and typing “VNC Viewer”
-
In the top bar, type the hostname of the Raspberry Pi followed by
.local. So, for a Raspberry Pi with the hostnametestpi, typeraspberrypi.localin the top bar and press enter. -
Enter the username (usually
pi) and the password(default isand click “OK”.raspberry, but use the one you changed it to, if you did change it)
Step 4: Replicating the setup for students
Once you have an image that is working, the last step is to save the image for later distribution.
Use Win32 Disk Imager to Save the File to your PC
I’ve traditionally used Win32 Disk Imager, since it’s a very easy way to create a copy of whatever image I’ve created and share it with students. Simply:
- Install Win32 Disk Imager on your PC
- Insert the SD card into your PC
- Select a location on your hard drive to save the new image (e.g., C:/Desktop/myimage.img)
- Click the “Read” button to save the SD card image to the .img file that you specified.
Mass-producing images for students
When I’ve used Raspberry Pis in classrooms before, I’ve had to create a number of images. One thing that I like to use is a multi-card SD reader/writer. I got a cheap one many years ago off Amazon that still works great, but can’t seem to find the model anywhere anymore. With a multicore PC, you can use an application like Win32 Disk Imager to burn multiple cards at once. Simply open the application a number of times that is one less than the number of cores.
Troubleshooting
No USB-C port on PC
This tutorial relies on a USB-C port on your computer to power the Raspberry Pi. If you do not have a USB-C port, we recommend that you use an external power supply.
It is NOT recommended that you use a USB 3.0 to microUSB cable to supply power to your Raspberry Pi from your PC. While a USB 3.0 port can deliver more power than standard USB 2.0 port, it is usually not sufficient to power the Raspberry Pi 3/3B+. The USB-C port provides much more power, making it much more suitable and reliable for powering current models of the Raspberry Pi.
HDMI monitor issues
Resolved by using latest image: Earlier 64-bit images of Raspberry Pi OS have issues with some HDMI monitors working. The fix is similar to what I blogged about two years ago:
-
insert the microSD card back into your laptop, and open up the
config.txtfile under the boot partition (/boot/config.txt) -
Uncomment the line that says
hdmi_safe=1. -
Safely eject the microSD card, and reinsert it into the Pi. Now it should work!
Please note that the latest version of the 64-bit Raspberry Pi OS image does not seem to have this issue.
VNC Client issues
If the VNC client frame is too large/too small for your monitor, you can
fix it by going into the /boot/config.txt file and modifying the the
following two lines:
framebuffer_width=1920
framebuffer_height=1080
Change the width/height to match your monitor specifications.