Note: I did not get paid for this review. I write reviews occasionally because I know there are educators who read my blog about using the Raspberry Pi
Happy summer folks!
My Raspberry Pi 4 CanaKits that were backorded months ago finally arrived, and I’ve been using those to build some remaining clusters for my students. Thanks to the chip shortage, my only option to get Pis were to buy the more expensive Raspberry Pi 4 starter kits, which are significantly more expensive than just a board and a power cable, and came with a lot of things I didn’t need or want.
Since a big part of cluster building is the “churn and burn” (where you repeatedly are burning the same image on different microSD cards), I was doing a lot of thinking about imagers these last few days. For the last couple of years, I’ve been a fan of Balena Etcher for it’s clean an intuitive user interface, and its open source nature. One thing I didn’t like about Balena etcher is that flashing took a long time (thanks to the validation step), but as I was almost always doing other work while I was flashing images, I always overlooked this flaw.
I recall at the SIGCSE workshop some faculty complaining about the frequent failed flash errors they were getting on their SD cards. This stopped some of the faculty from continuing on with their own Raspberry Pi projects; they asked me and the rest of the CSinParallel team about any suggestions. At the time, I was very surprised about the flash errors they were reporting. It was not an issue that I frequently dealt with. Until last week.
Imagine my surprise and dismay when I started getting “validation failed” errors with Balena Etcher on nearly every one of my new flash cards. I tried different microSD readers and multiple cards, and nope, same error. The errors always seemd to occur in the validation phase of the Etcher program. Unchecking the validation option did not seem to work; Balena still said “flash failed”. So I tried a different tack: a couple years have passed. Is there a better program for flashing SD cards? Turns out the answer is yes.
The Raspberry Pi Imager
Unbeknownst to me, the Raspberry P Foundation released the Raspberry Pi Imager two months ago in March 2022. Having used the imager for this last round of cluster image flashing, I must say that I am very impressed, and this will be the go-to imager I use going forward when “churning and burning” clusters and boards for my courses. It won’t be the only imager I use for my Raspberry Pi projects (see the missing features section), but it will be replacing Balena Etcher for me going forward.
Intuitive Interface
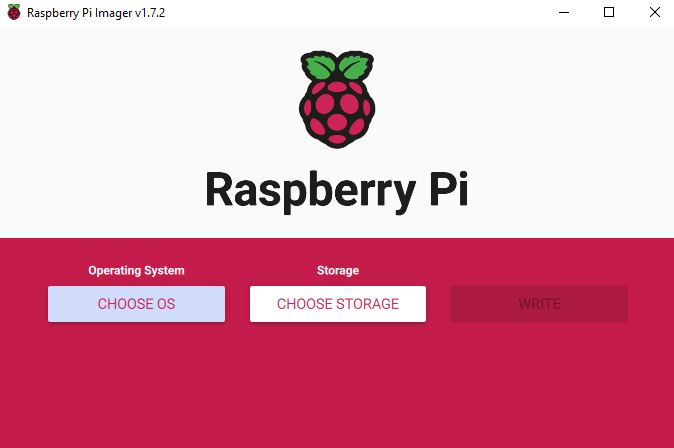
Like Balena Etcher, the Raspberry Pi Imager has a very clean and intuitive interface. There are only three buttons:
- Choose O.S. allows you to select your desired O.S./image
- Chose Storage is where you select the target SD card to write to
- Write will start writing the selected O.S. to the target S.D. card.
Like Balena Etcher, the Raspberry Pi Imager is an open source project, and supports a wide range of operating systems.
Built in O.S. functionality
If you have a custom image, you can select “Use Custom” after clicking the “Choose OS” button and then navigate over to where the disk image file is saved on your computer.
The thing that really sets Raspberry Pi Imager apart is its built-in selection of Raspberry Pi operating systems. Clicking on the “Choose OS” button will reveal a variety of options.
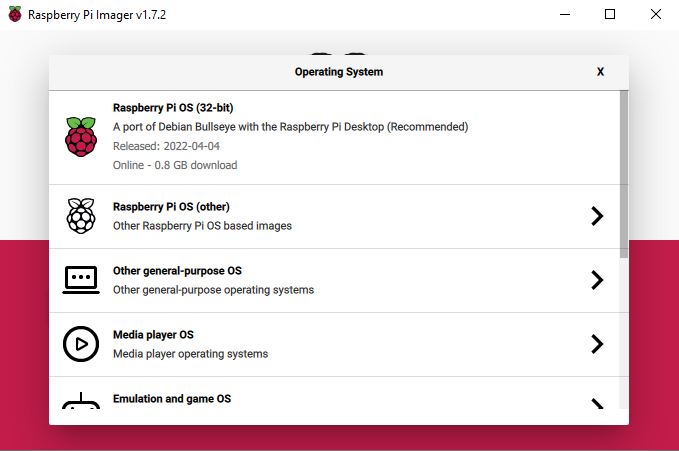
In addition to the 32-bit Raspberry PI OS main image, you can select Raspberry Pi OS Lite (32-bit), the newly released 64-bit Raspberry Pi OS (even the lite version!), and a couple of legacy options.
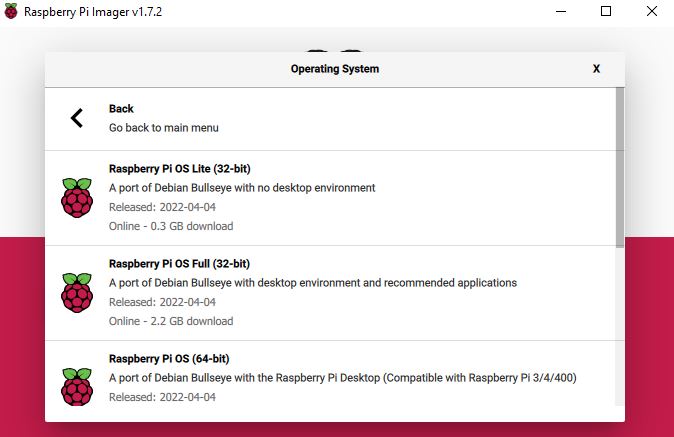
Under the “Other General-Purpose OS” tab, you can also select Ubuntu, Manjaro ARM Linux, Apertis, and RISC OS Pi, there are also pre-built O.S. tailored for common Raspberry Pi functions (such as media server, emulation/retro-computing, 3D printing, home assistants/automation, digital signage displays, and more. The beauty of this setup is that the user does not need to go through the steps of downloading the image themselves, unzipping it, and then selecting it for burning. During this process, the Imager is downloading a local copy of the imager to your computer, but in a cached location so it can find the image again for successive burns.
While I can’t verify this, I imagine the custom imager will also have future updates that will allow the Raspberry Pi foundation to ensure that the images options under the “Choose OS” point to the latest image versions, which will be good for security.
It’s so fast
Maybe I have forgotten what a fast imager is like, but wow, flashing with the Raspberry Pi Imager was not only easy, but it was fast. I burned 21 SD cards with the CSinParallel Pi cluster image in just a few hours (OK, I wasn’t counting, but it definitely didn’t take me all day). For busy professors who need to quickly flash their Pis for classroom use, I cannot emphasize how important this is.
One quibble that I have is that when it is done flashing, if you click anywhere on the Raspberry Pi Imager screen, the white box that indicates that the flash is done disappears. That means, if you are doing other work (like I frequently am) when flashing a number of cards, it’s easy to miss if the card you are flashing actually completed successfully. Folks, I was so surprised at how fast the imager was, I reburned a few flash cards twice because I didn’t think I actually flashed them.
I was also worried that perhaps the imager was erroring out and not reporting the error to me (after all, Balena did give all those errors), and perhaps that is why the flash was so fast. To my elation, when I booted up my newly flashed clusters to test them, they worked beautifully!
Missing Features
While the Raspberry Pi imager will be the go-to imager that I will be using for my Raspberry Pis going forward, it still will not serve as the only imager that I will be using. Like Balena Etcher, the Raspberry PI Imager lacks that one critical feature that I usually look for: a way to read SD card images.
Why is reading so important?
99% of the time, I am writing an image to an SD card. However, sometimes,
I configure an SD card for classroom use with custom scripts and configs, and
want to simply make a copy of that image as a backup (aka read it), or churn
and burn with that image. Unfortunately there are not many tools out there for
that. Linux users can use the dd utility, and I have heard that
ApplePi Baker
is second-to-none for MacOS users (one thing one of my colleagues report is
can actually shrink images prior to writing to disk with ApplePi Baker! You
can obviously do this with dd, but if your uncomfortable with Linux and/or a
Windows user, no such luck for you).
Since the students at my college primarily use Windows, I am always looking for Windows-based solutions. Unfortunately, the best tool out there that I know of is the old faithful Win32 DiskImager that I have used for years. However, Win32 Disk Imager is old. Every time I get a new Windows laptop, my trepidation about reinstalling Win32 Disk Imager grows. While I believe that the SourceForge link is still the only official download link, there are many scary clones of the program around the Internet. SourceForge’s reputation is also not what it was ten or fifteen years ago. Perhaps at some point in my copious spare time I will learn a configuration management tool like Ansible and ditch image creation altogether. With Win32 Disk Imager feeling less and less reliable to me, I may have to eventually go that direction.
Conclusion
All in all, I have been very pleased with Raspberry Pi Imager. I plan to use it as my primary SD card writer for Raspberry Pis going forward. It’s unclear if I can use it for non-Raspberry Pi SBCs, but that is something I will certainly check in the future.
That’s all for now.